4 Simple Sewing Skills That’ll Save Your Clothes — and Your Money


Louise Weaver is shocked when people take their clothes to an alterations shop and pay $5 to $10 to have a button sewn back on. And she’s shocked when others decide to throw away a pair of shorts when they lose a button.
“Sewing is just something basic. It’s not that hard to fix a ripped seam or sew on a button,” said Weaver, who lives in St. Petersburg, Florida. “I buy clothes I really like and then I keep them for a long time because I know how to repair them.”
Weaver is not a couture dressmaker or Fashion Runway wannabe. She has a basic Singer sewing machine and an organized sewing box. She mostly sews to take in a dress, replace a button or stitch up a ripped pillow, which doesn’t even require a machine.
Knowing how to do a couple of basic stitches will make your clothes last longer, which can help you save money. You’ll also save money by not having to pay for alterations.
Plus, knowing how to sew lets savvy shoppers score great deals at thrift stores or from traditional retailers that don’t quite fit perfectly or need a little TLC. Maybe that Lucky Brand sundress is marked down from $80 to $29 because the straps are too long on any woman under six feet tall, or that J. Crew tie is on clearance for $14 because the label that holds the long end of the tie in place has come loose on one side.
The consumer who knows how to fix these minor issues has a competitive shopping edge.
Here are a few primers on basic sewing skills with links to helpful videos. Learning how to do these things will stretch your wardrobe dollars much further.
How to Thread a Needle
1. Use scissors to trim the end of the thread so it isn’t frayed.
2. Hold the end of the thread between the thumb and forefinger of one hand so about a quarter-inch of thread sticks out. Hold the needle in the other and between thumb and forefinger.
3. Line the thread up with the eye of the needle, then push it through until an inch comes out the other side. You can moisten the tip of the thread with your mouth to give it extra stiffness, which could make it easier to thread it through the eye.
4. Pull about 18 inches of the thread through the eye and pull it down along about 18 inches of thread coming off of the spool, then cut the thread at the spool.
5. Hold the two ends together and tie a knot by making a small loop and pulling the tail through the loop. You can tie two knots like this on top of each other.
You can also use what’s called a threader. A threader is a thin, flat metal tool shaped like a nickel with a small wire loop. They often come with a pack of needles, or you can find packs of two threaders for about $2.
Here’s how to use a threader:
1. Move the eye of the needle down over the end of the wire loop.
2. Stick the thread through the loop until about two inches of thread have emerged on the other side.
3. Slide the needle off the loop and it will go right over the thread. Keep sliding the needle along the thread until it’s about 18 inches out.
4. Follow steps 4 and 5 from the needle-threading tutorial found above.
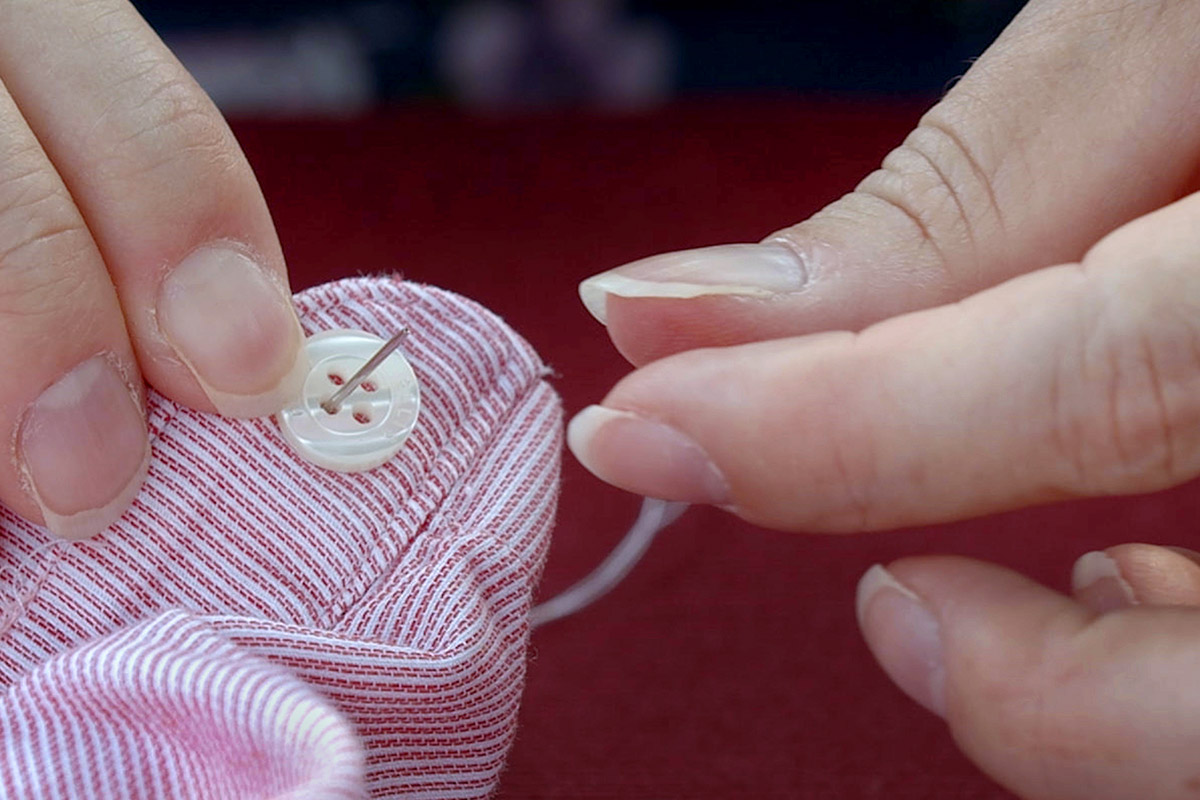
How to Sew on a Button
1. Stick the needle halfway through the fabric where the button belongs.
2. Place one of the holes of the button over the needle, then pull the needle and thread all the way through the hole until it is anchored by the knot on the underside of the fabric beneath the button.
3. As if making a U-turn, push the needle down through another hole of the button, then pull it through from the underside until the thread is taut. If the button has four holes, stick the needle through the button that’s diagonal from the first hole.
4. After you pull the thread all the way through the hole, push it back through the fabric through the first hole.
5. Continue sewing stitches between the two holes about five times, then push the needle up through one of the other two holes and pull it through the remaining hole. Repeat five times.
6. After the fifth trip through the last set of holes, when the needle is on the underside of the fabric, make a loop with the thread and bring the needle through the loop to make a knot. Do this three times, then clip the thread so that about two inches of thread are left.
7. Tie several knots in the two-inch tail of thread.
How to Sew a Running Stitch
This versatile stitch can be used for several purposes, including fixing pockets, closing seams that have come undone, sewing appliques and patches onto clothes and reattaching belt loops.
You can also use this stitch to take in a skirt, shirt or a dress. To do so, turn the clothing item inside out and pin a line along the seam to make it fit better. Use tailor’s chalk to mark the line between the pins, then sew along the line.
Here’s how to do a running stitch:
1. Bring the needle and thread up through the fabric, then take it back down through the fabric about a quarter-inch over.
2. Repeat this pattern across the fabric.
How to Fix a Hem
The slip stitch is used for fixing a hem, or making repairs that will barely show on the front side of the garment.
1. To hem a garment, stick a pin horizontally through the fabric at the desired length.
2. Measure the distance to the bottom of the garment, then space pins three inches apart around the garment, making sure they’re the same distance from the bottom of the garment.
3. Cut the excess fabric off, leaving two inches (if possible) below the pins.
4. Fold the raw edge under by about a half-inch, and pin it to hold in place. Then iron it flat.
5. Fold the hem up again along the line marked with pins of the desired length. Remove the pins of the fold line as you go and pin the hem in place. You’ll be pinning through the folded edge you ironed earlier so there is a smooth finish on the inside of the garment.
6. Once the hem is pinned and ironed, use the hem stitch as follows:
- Stick the needle through the top of the fabric folded up, known as the hem allowance. Then, use the needle to pick up a few threads or fibers just above the hem.
- Next, take the needle through the hem allowance again, about a quarter of an inch further along the hem.
- Pick up a couple threads from the garment above the hem again.
- Repeat this stitch all the way around the garment.
The same stitch can be used to sew a tie label on the back of a tie or a loose zipper back in place. The trick is to pick up just a few threads of fabric on the outer side of the garment and make stitches close and tight together.
More Sewing Tips for Beginners
Here are some other general sewing tips that’ll help you keep your clothes in good shape.
1. Use thread that matches the color of the fabric. If it’s a print, use the dominant color.
2. If you’re sewing through several layers of fabric, use a thicker needle and thimble to push it through.
3. Always sew in good light.
4. Use scissors that are sharp and sturdy.
5. You will need an iron, but you can use a towel on a kitchen counter for an ironing board.
6. Some rips can be repaired by ironing a patch on the underside of the fabric — no sewing needed.
Katherine Snow Smith is a freelance reporter and editor in St. Petersburg, Fla., and author of Rules for the Southern Rulebreaker: Missteps and Lessons Learned.