These 3 DIY Storage Boxes are Just Too Stylish to Hide Away


Like most people, I get a lot of packages in the mail, and I own a lot of stuff. I’d also like my stuff to look good when I store it.
But storage boxes and baskets can be expensive. Why not use the package boxes that are already coming to your house — and a few basic supplies you might already have — to make your own storage boxes? Here are three easy options to get you started.
Store Vacation Treasures in a Map-Covered Box

Instead of buying a photo box to store your memorabilia from a trip, use a map to make the storage box part of your nostalgic display.
Materials:
- Kid-sized shoebox
- One foldable map (grab one at the visitor’s center while on your trip, or order one for about $2.25 on Amazon)
- Pencil and scissors
- Spray glue (my favorite is Super 77, which runs $7.37 a bottle from Amazon and will last you forever)
- Three pieces of ecru-colored felt or color of your choice (optional; I used some out of my stash, but you can buy felt for 49 cents a sheet at JoAnn Fabric and Crafts)
Instructions:
Use the pencil to trace the sides of the box on the map, making sure to include the part of the state or country you visited so that it will be the front of the box when it is stored.
Cut out each side individually so you can orient them face up when you attach them to the box.
Use spray glue on the back of each map piece and adhere them to the sides.
Trace the shape of the top of the box (I did the top in one piece), cut out and adhere as with the sides.
If desired, trace the sides again on to pieces of felt and use spray glue to adhere felt to the inside of the box. You could also use paper, more of the map or flyers from places you visited on your trip — whatever you like.
Fill the box with souvenirs, printed out pictures, seashells, brochures and other memories from your trip.
Cost comparison: Assuming you have to buy all the supplies, this project would cost just over $11. It’s hardly fair to count the glue, though, so just buying the felt and the map makes it $3.72. The least expensive photo boxes on Amazon are $6.99, and they aren’t nearly as meaningful.
Organize Craft Supplies in a Divided Box
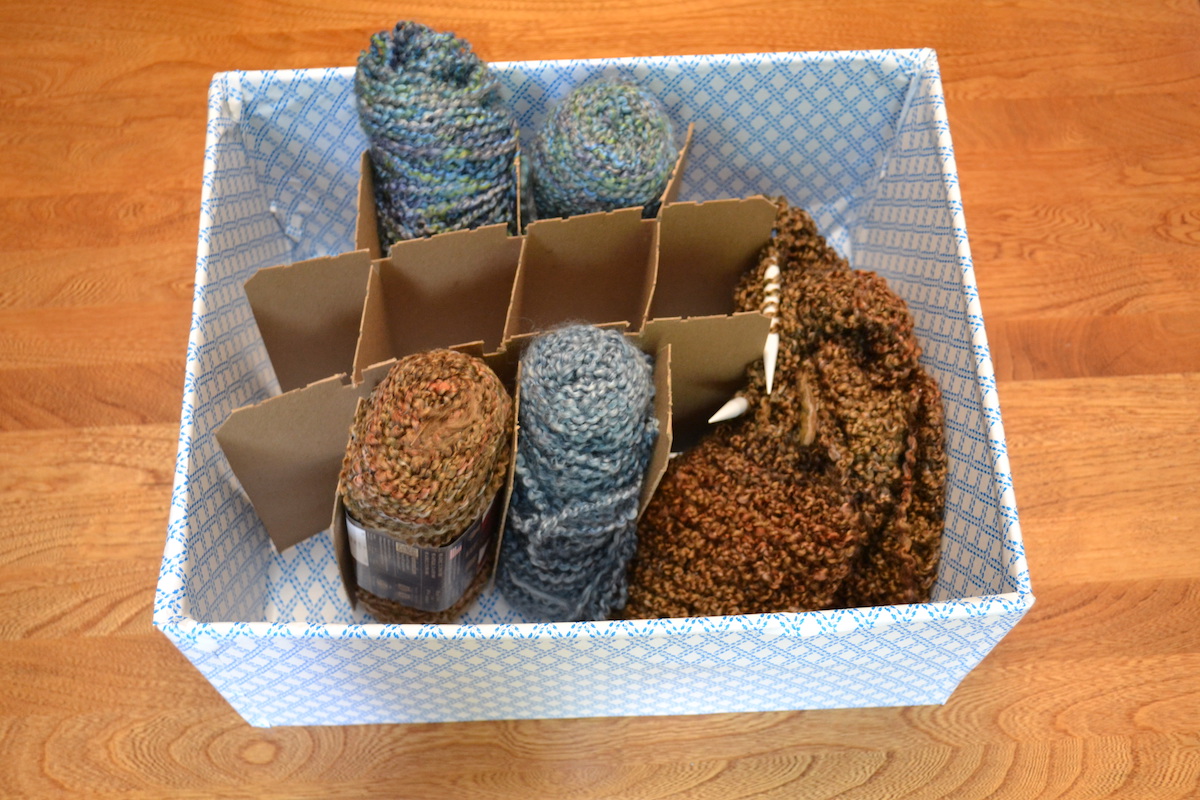
Use a large shipping box, covered with Con-Tact paper with DIY dividers, to store yarn, fabric or other supplies that might need corralling.
Materials:
- Large shipping box
- One roll Con-Tact paper (mine is called Arbor Marina and was $6.43 on Amazon)
- Scissors
- Cardboard pieces for dividers
Instructions:
My box happened to be almost exactly the same width as the paper roll, which made this much easier. Otherwise you will need to cut your pieces down like in the previous project. I cut one piece large enough to cover down one side, across the bottom and up the other side, and then I cut the other sides separately.
Cut duplicate pieces of Con-Tact paper to cover the inside. Cut slits in the paper where it needs to cover corners so you can fold it more easily.
For the dividers, you can take the dividers out of a wine box, or use the flaps from the top of a cardboard box and cut them down to size. If you like you can cover them with Con-Tact paper, too, but, depending on the size of your box, you may need a second roll.
Cost comparison: If all you have to buy is the Con-Tact paper, this project costs $6.43 or less (you can even buy Con-Tact paper at the dollar store, though the patterns are limited and the rolls may be shorter). Compare that to a bento-style storage box on Amazon, which would cost $33.38 for a similar size (19x12x10 inches compared to my box that was 18x14x8).
Add a Rustic Splash of Color with a DIY Wooden Box
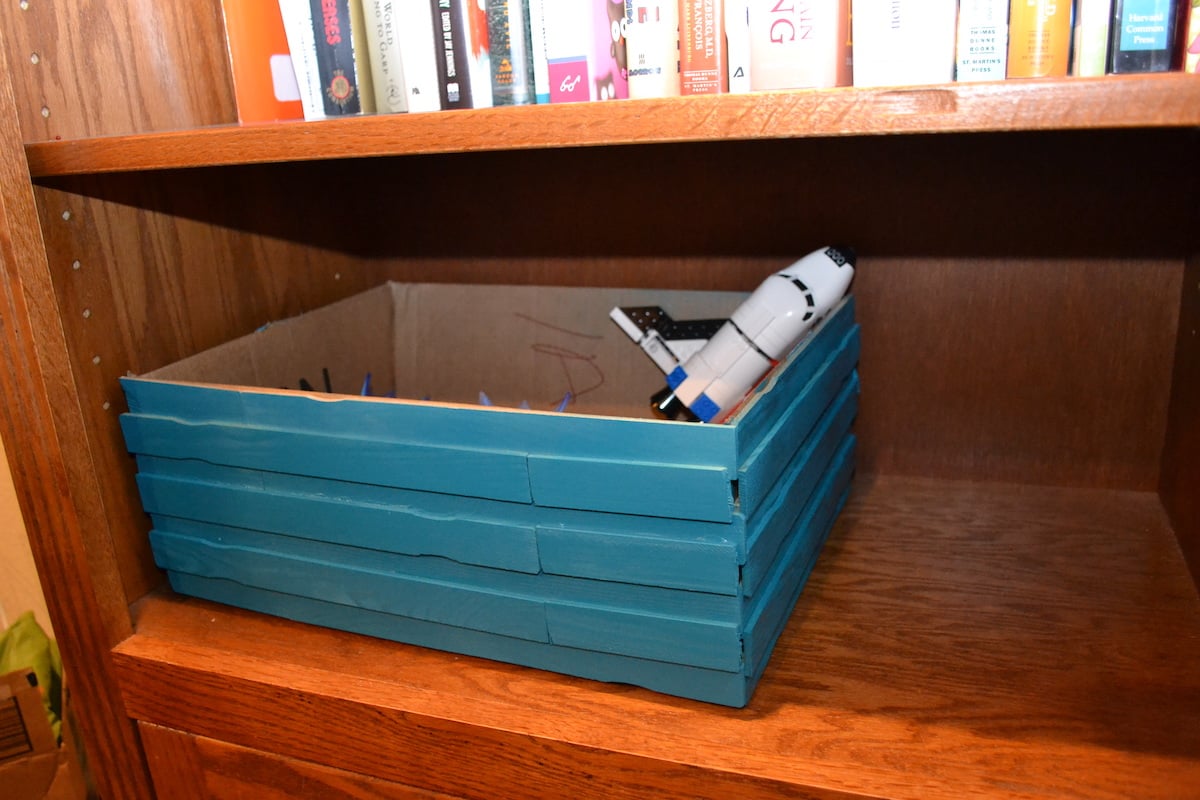
Here’s another great way to update a shipping box when you want it to look nice enough to go on a bookshelf, desk or mantle. It’s more time consuming than the other projects, but it’s so lovely you’re going to want to make a bunch of them to display.
Materials:
- Shipping box
- Paint stirring sticks (I bought 30 for $10.99 on Amazon)
- Glue (wood glue or standard)
- Craft knife or utility knife
- Scissors
- Sandpaper
- Spray paint (I used some I already had on hand, which cost $3.30 at Lowe’s)
Instructions:
To cover the longer sides of the box, I had to use one whole paint stick and part of another. The short sides of my box happened to be the same length as the paint sticks, but on the shorter sides, you may need to cut sticks to fit. To cut the paint sticks, I used a sharp craft knife and a dull pair of scissors to score the wood enough so that I could break it, then used sandpaper to smooth the edge.
Glue a single paint stick or row of sticks along the top of one side of the box, then glue the second row of paint sticks on top, overlapping a bit. Glue the next row underneath the second one, overlapping a bit.
Repeat on as many sides as you like. If you know this box is going on a shelf and you’ll never see the back, I won’t tell if you don’t cover it.
Spray paint the sides of the box. I used two coats, allowing the box to dry in between.
Cover the inside of the box as you like, with Con-Tact or other paper, spray paint or just leave it plain.
Cost comparison: Buying both the paint sticks and the spray paint would cost $14.87. A smaller wooden crate (11.5×8.5×8.25 compared to my 12x16x6) with solid slats and a chalkboard label retails for $29.99 at Jo-Ann Fabric and Crafts.
Labeling and Making It Your Own
Speaking of labels, you can use leftover paint stirrer pieces and a bit of cardboard covered with chalkboard paint (which will run you about $4) to make a customized label to mount on your box.
You can also use a bit of cork board to label your boxes. Cut cork board into a fun shape and glue to the front of the box. You’ll have a versatile way to tack on labels, photos and notes.
Your map box is already labeled as to the location where the things inside were gathered, but feel free to add a star sticker to the city or cities you visited to make it a bit more fun.
Disclosure: Here’s a toast to the affiliate links in this post. May we all be just a little richer today.
Sarah E. White is a freelance writer, editor, crafter and mom based in Arkansas. She writes about creativity for moms and other busy people at Our Daily Craft and about decluttering craft supplies and using what you have at Minimalist Crafter.